Basic TV Staging (1974)

9780240508528-us

Another book by G, Millerson Basic TV Staging will help explain key concepts about composition within a shot, this will allow me to stage mine so that there is balance within each so that it looks more aesthetically pleasing.

Within the book I will be specifically looking at Chapters:

  • Purpose of Staging (Page 10)
  • Staging Styles (Page 16)
  • Staging Opportunities (Page 18)
  • Neutral Backgrounds (page 112)

Purpose of Staging

Staging or setting the scene within a animation or video aims to create a particular pictorial effect, this then creates a reality which was never real in the first place – it was materialised, for example having a star field background in an animation aims to immerse the views into believing that it took place in space, when in reality it was created digitally. So generally, it can be stated that staging provides the background for the performance of the project, and this background can consist of the plainest materials or really complex ones – it still has the same general effect. However, it is key to note that having the wrong background for the performance may dominate it – this would take the viewers attention from the performance which isn’t beneficial.

Staging Styles

When it comes to staging my animation, I will have to think clearly as the background should match both the programme material and presentation approach – It wouldn’t be very effective having a bright pink background when the whole animation is supposed to take place within a space/zero gravity environment. I will try and replicate a realistic environment, in this case space – i will create a ‘star field’ material inside of C4D where you can see glowing stars when rendering, this will help reinforce the notion that it is in a space setting, however, I will have to play with the settings to make sure that the background/stars aren’t too dominant to distract the viewer.

Staging Opportunities

A major factor when considering the opportunities of staging are the physical parameters of the objects, as the scene will be consisting of a cube with a ring of sphere’s around it, I will have to factor in its size – if the background is too narrow then it will appear that some of the spheres will be cut in half which will be an undesired aesthetic. Additionally, the staging also needs to conform to established concepts or notions that people already have about space – this is an opportunity to further boost the realism in the animation as observant viewers will realise thats what its trying to replicate.

Neutral Backgrounds

If I am unable to get the ‘star field’ material to work in my animation, I will be using neutral background – again as its a space themed animation, I will use a black background which connotes notions of: Night, Mystery, Heaviness, Sombreness and Smartness – to which I intend to try an incorporate the element of mystery, especially with the use of the geometric cube. A benefit of having a neutral background is that I can have a wide range of flexibility with the camera settings, notably with the depth of field – having a shallow depth of field blurs the background of any scene, having a plain neutral colour allows for wider extremes to push the camera too as there re no significant details in the background that are lost.

Grammar of the Edit (1993)

Thompson_Edit

Editing will be another aspect in my animation, this book explains when to cut and why which will aid in making my animation flow more smoothly and not cutting away prematurely.

Within the book I will be specifically looking at Chapters:

  • The Edit (Page 40)
  • The Cut (Page 50)

The Edit

An edit can be generalised as a transition between two shots, however, it can take many forms including: a straight cut, a mix (fade from one shot to another) and a fade (fade to black/white) – to which each of them connote different meanings. It is highly emphasised that when in the editing process that there should always be a good motivation to make a cut, either that being a visual edit within my animation or a auditory edit in sound to ideally denote new information to the audience. If this is adhered to, the fresh range of visual/auditory information will keep the audience interested in the animation without being too patronising – resulting in a higher finished project being created.

The Cut

Within an animation there are cuts in the visuals which stitch together the narrative, however, good cuts are usually made up of 6 key elements which intend to adhere to:

1) Motivation – During the final stages of my animation when I’m editing, there needs to be a good reason to cut from one piece of footage to another. If there is no new information being supplied in the next shot, the audience will become bored of what is being seen – for example, if I show a red coloured sphere and cut to another one, there is no extra info adding to the audiences experience. However, if instead of cutting to a plain red sphere, it cuts to an orange one it makes it slightly more interesting as different and something new is happening.

2) Information – Like above, a new shot should contain new information – for example, a red sphere cutting to an orange sphere. Although not a lot difference in present, the change in colour still adds to the diversity of each shot.

3) Composition – Each shot should have a reasonable composition, this should be a balance between a object space and negative space where nothing present but also the rule of thirds can be used. Having object falling on each third line will aid in achieve a more aesthetically pleasing shot.

4) Sound – Ideally, when an edit occurs there should still be some sort of sound continuity between shots – this will achieve a flowing narrative and help one shot flow into the next even if they aren’t related. Oppositely, if an edit occurs where a close up (CU) cuts to a long shot (LS) the sound could also reflect this by becoming quieter or echoed.

5) Camera Angle – Each new shot should be on a different camera angle, this can help give the audience more information about the subject in the composition. However, in my animation I feel that having similar camera angles will help keep the audience orientated in the space environment – constantly changing the came angle might make it hard for the audience to understand where they are in relation to the subject.

6) Continuity – Movement or action should be evident/similar in the last shot to new shot – this will be a key convention to follow, especially during the end of the animation where the sphere moves inside of the cube, as I plan on drawing the camera from the mid shot (MS) of this event to a LS and having it matched perfectly will be essential.

Material/Texture Inspiration

Particle Cell from Ismael Mensa on Vimeo.

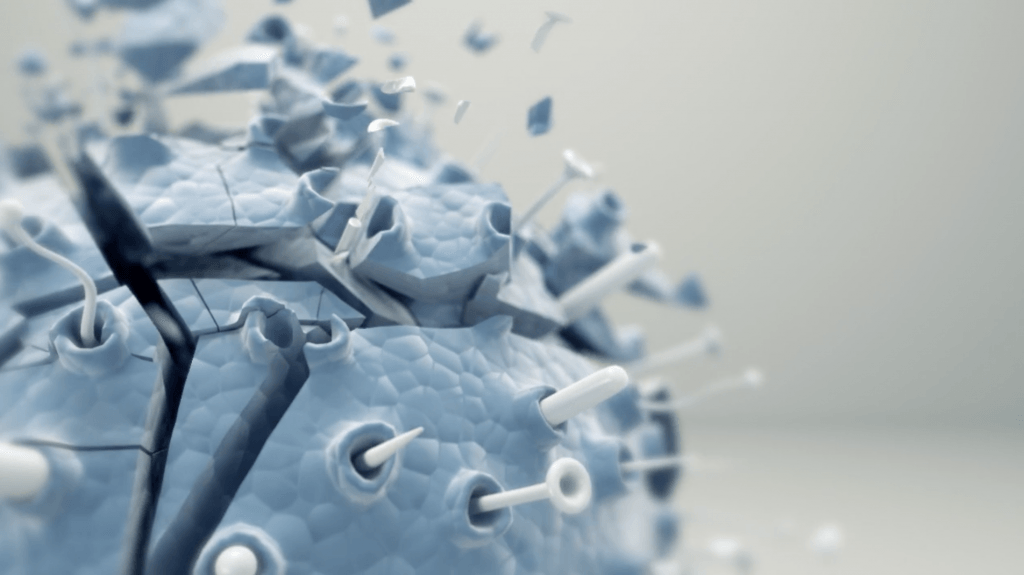
After browsing on Vimeo I came across this demo showcasing someones ‘Particle Cell’ model that they created. Theres many different layers of detail on the model that I really like, which has inspired me to try and replicate some of the characteristics into my own particle work. One of the first details that I noticed about the object is the bubble/scale texture on the very base of the sphere, it gave me a organic feel to the model and make it look like a form of armour or protection to the organism. The second detail that I noticed was the fracturing that was affecting the whole outer shell of the object, this again added another interesting dynamic to the object which, I further feel would be put into context through adding it to a scene. Lastly, the reflectiveness and brightness of material, to which I feel, are at the optimum point for this object – Although I wont have my spheres a bright blue colour, I still like how the material isn’t too glossy where it looks like a mirror but still reflects light in a pleasing way.

Screen Shot 2017-10-31 at 10.16.52 Screen Shot 2017-10-31 at 10.17.10

Conclusion

There are lots of characteristics about this object/model that I really like, the main one being the bubble/scales texture on the immediate surface of the object. I feel that I could use a similar texture like this to make my particles in my animation more visually interesting especially in those close up shots in the beginning of my animation,  this will make the spheres be less boring and will scatter the light differently when illuminated, drawing the views attention. However, there were also some elements to the object that I didn’t particularly like, for example, the holes and the different shaped arms coming out of the surface. I felt like they were too irregular but I can see that it adds to the diversity of the object making it more visually interesting.

Tutorial Notes – Intro into X-Particles

Intro To X-Particles from Greyscalegorilla on Vimeo.

GreyScaleGorilla is a very experienced user of Cinema 4D & of X-Particles and subsequently has a large archive of information on the software which is very useful to learning the basics on both. The video above is a short introduction to X-Particles and gives lots of useful information on basic set-ups of the plug-in (notes below):

BASICS

Particle System – Adding a particle system: X-Particles > Particle System > Add Basic Set-up 

Emitter Shape – When the particle system is added, the emitter shape defaults to a square which can be changed within the settings to become any shape: Shape > Emitter > Object > Emitter Shape

No. of Particles – The particle emitter can be edited to create more/less particles from the source: Emitters > Emitter > Emission > Birthrate

Modifiers – A numerous amount of modifiers can be added to affect the particles (such as turbulence, wind and gravity): System > Add Objects > Modifiers

Texturing – Texturing works differently to normal C4D materials, to texture an x-particles system it needs to be an x-particles material: New Material > Shader > X-Particles Material (> Add to Emitter)

Size – The size of the particles can also be changed, however, this is done within the material: Emitters > Emitter > Emission > Radius

Size Variation – The size can also be varied by a % entered by the above route: X-Particles Material > Size > Variation

Colour – The colour of the particles can also be varied by picking a gradient as to what colours the particles can be: X-Particles Material > Colour > Colour Properties > Mode > Random (from gradient)

Lighting – The particles can be illuminated the same way as normal C4D particles would be: Add a Light > General > Shadow > Select Shadow

DYNAMICS

Gravity – Although its not necessarily relevant for my animation, gravity dynamics can be added to affect the particles: System > Add Objects > Modifiers > Gravity

Tags – Like C4D, x-particles tags can be applied to the objects to give them specific characteristics to adhere to: Tags > X-Particles Tags

Key to note that the Collider Tag would be most relevant to me as it means that the particles will react to other ‘solid’ objects in the scene when they contact each other (meaning they wont pass through each other – act like real world objects).

Lighting for Video (1991)

Screen Shot 2017-10-30 at 14.38.16

Lighting would be a key element within my animation, this book would explain key concepts and theory behind lighting a scene for video and will allow me to light my animation effectively.

Within the book I will be specifically looking at Chapters:

  • What Does Lighting involve? (Page 14)
  • The Aims of Lighting (Page 16)
  • Changing Camera Positions (Page 76)

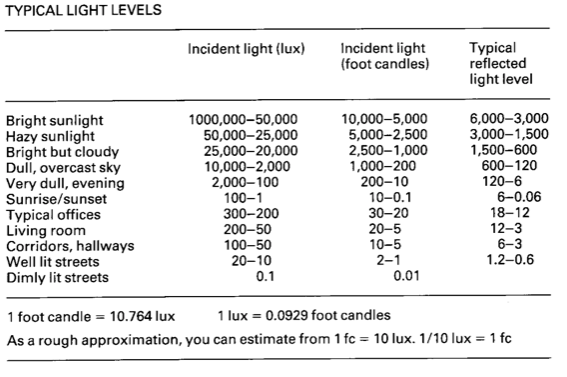
In the brief introduction to the book, it describes different details about why we need lighting for videos and also gives different reasons as to why we might not always have adequate lighting in our specific environment. Under this section it gave an interesting table of different light levels and their values (Shown below).

Screen Shot 2017-10-30 at 14.34.55

I thought this might be very useful to know as within Cinema 4D I am able to control the brightness and temperature of the light that is emitted – having this table will allow me to replicate realistic lighting within my scene as I can simply enter the luminance data into the software to give it a specific look. However, this might not necessarily work as the scene I intend to produce will be in a space/zero-gravity environment and thus the lighting will be different from earth lighting.

What Does Lighting involve?

Adding lighting to a scene makes for better or more effectively lit shots (from the perspective of the camera), this can be in addition to the global illumination and ambient occlusion within the C4D render settings to make sure the scene is fully lit. As well, checking the lighting through the camera perspective can “considerably improve picture impact” or through rendering out a still frame from the scene to check that it is all illuminated effectively will save time when rendering the full sequence as it will take a considerable  amount of time to render the full scene (Millerson, 1991).

The amount of light needed to illuminate a scene varies and there is no regular set-up to ensure optimum lighting – a basic lighting set-up (such as a 3 point lighting studio) could be employed into the scene, however, the optimum pictorial effect would need to be added, which is a perfectly angled light to make key elements within the scene be highlighted.

The Aims of Lighting

The main preoccupations of lighting are with the appearance of the subject itself and the surroundings. Subject based lighting can emphasise characteristic features about it and has the ability to make them less/more obvious – this would be very fine line within my animation due to the materials, low key lighting would make the object less obvious but bright lights would spoil the scene as the shiny surfaces may distract the views eye.

Changing Camera Positions 

Effective lighting depends on camera position in the scene, the best general solution is to employ a ring light studio to the scene which would illuminate all of the objects to a certain level – however, more lights will have to be added to change/ eliminate shadows that might be cast, this could be a good general solution again for my scene as I would be able to change settings from the ring lighting studio to disable the shadows, however, testing will have to be conducted to see whether having shadows positively affect the aesthetics of the animation or negatively.

Ref: G, Millerson. (1991) Lighting for Video. London: Focal Press.